
Welcome to Apex Solutions, a premier Managed Service Provider (MSP) specializing in a full-service stack that covers cybersecurity services, full backup, and IT support for businesses of all sizes.
{install redmine on ubuntu}
How To Install Redmine on Ubuntu 20.04 in 2024: Step-by-Step Guide Complete Tutorial
an easy step by step guide
How To Install Redmine on Ubuntu 20.04 in 2024: Step-by-Step Guide Complete Tutorial
In today’s fast-paced world, effective project management is more crucial than ever. Redmine, a versatile open-source project management and issue tracking tool, has gained significant popularity among teams worldwide, thanks to its flexibility and robust features. If you’re using Ubuntu 20.04 as your operating system and looking for a comprehensive guide to install Redmine in 2023, you’re in the right place.
In this blog post, we’ll walk you through the entire process of installing Redmine on Ubuntu 20.04, with easy-to-follow, step-by-step instructions. Whether you’re a seasoned developer or a project management enthusiast, this guide will help you effortlessly set up Redmine on your system and unlock its full potential.
Stay tuned to learn about the prerequisites, best practices, and troubleshooting tips for a seamless Redmine installation experience. Let’s dive right in and get your project management skills up to speed with Redmine on Ubuntu 20.04!
Step 1: Update and upgrade your Ubuntu system
Begin by updating and upgrading your Ubuntu 20.04 system using the following commands:
					sudo apt update
sudo apt upgrade
Step 2: Install MariaDB
Next, install MariaDB, which will serve as your back-end database: This step can take up to 5 – 10 mins for the download and install.
sudo apt install mariadb-server
Step 3: We’ll going to connect to MySQL and create our Redmine database as well as setup a Redmine username for the database. Connect to Mysql using the following command
sudo mysql -u root -p
Step 4: Once connected we’ll going to create the Redmine database using the following command:
CREATE DATABASE redmine CHARACTER SET utf8mb4;
Step 5: Next we’ll create the Redmine user and give it all the privileges using the following command: Make sure to replace “REDMINE_PASSWORD” with a password you would like. I usually change it to Admin123
GRANT ALL PRIVILEGES ON redmine.* TO 'redmine'@'localhost' IDENTIFIED BY 'REDMINE_PASSSWORD';
Step 6: Next we’ll do a Flush Privileges command and exit mysql: This is the password you created when you made the redmine user
					FLUSH PRIVILEGES;
EXIT;
Step 7: Lets verify our Redmine user works on the databases: Log back into mysql using our Redmine user by doing the following:
mysql -u redmine -p
Once you have logged in. Do a show databases and you should see the Redmine Database tables like the following:
					show databases;
+--------------------+
| Database |
+--------------------+
| information_schema |
| redmine |
+--------------------+
2 rows in set (0.019 sec)
quit;
Step 8: Now that we have verified that our Redmine user is good. We are ready to install the Apache Web Server by doing the following:
sudo apt install apache2 libapache2-mod-passenger
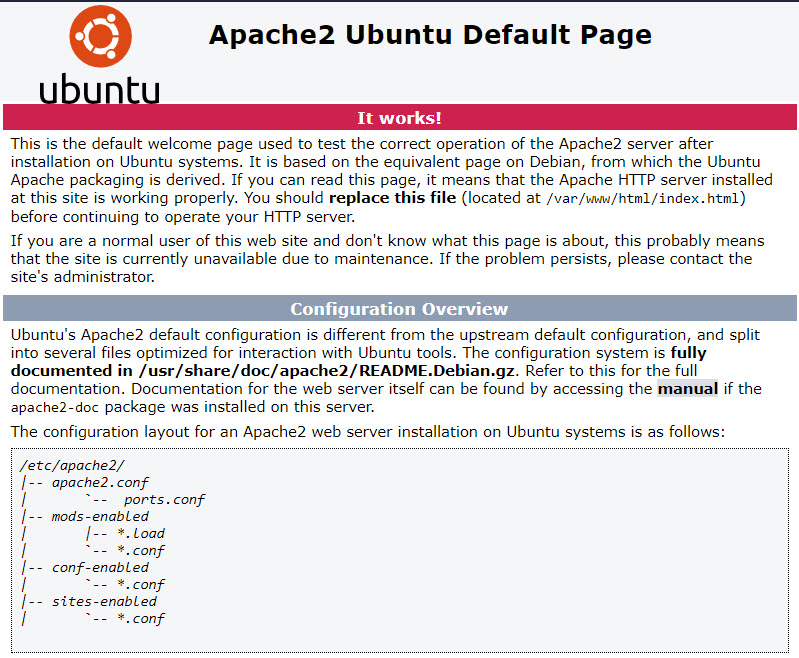
before moving on to Step 9, we want to make sure apache is installed correctly. We can do that by opening up a browser and putting in your current computers IP address into the URL bar. If installed correctly, you should see a screen like below.
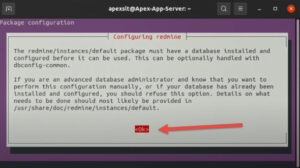
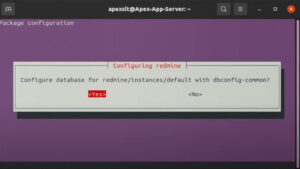
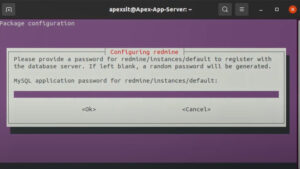
Step 9: Install Redmine mysql by doing the following:
sudo apt install redmine redmine-mysql
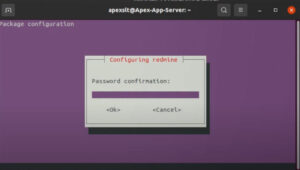
During the Redmine mysql install, you will be prompted to enter your Redmine user admin account we created in Step 5. My password was Admin123
Step 10: Update and install and Gem Bundler
sudo gem update
Step 11: Install Gem Bundler
sudo gem install bundler
Step 12: Now we’ll edit and configure the Apache passenger module. By adding this line of code < PassengerDefaultUser www-data > to the top of passenger.conf file. I use vi but you can use any editor like nano. We edit the passenger.conf by doing the following:
					sudo vi /etc/apache2/mods-available/passenger.conf


<IfModule mod_passenger.c>
  PassengerDefaultUser www-data
  PassengerRoot /usr/lib/ruby/vendor_ruby/phusion_passenger/locations.ini
  PassengerDefaultRuby /usr/bin/ruby
</IfModule>
Step 13: Create a symbolic link for Redmine
sudo ln -s /usr/share/redmine/public /var/www/html/redmine
Step 14: Now we’ll need to create and configure our Redmine website file by using vi or nano:
sudo vi /etc/apache2/sites-available/redmine.conf
Once you are in the file, you will need to copy the code below into the Redmine.conf file. You will need to change <REDMINE_PASSWORD> to the password you used in step 5. I used Admin123. Next, you will need to change <SERVER_IP_ADDRESS> to the ip address of your Redmine server’s IP. And save the file.
					ServerAdmin REDMINE_PASSSWORD
  DocumentRoot /var/www/html/redmine
  ServerName SERVER_IP_ADDRESS

    RailsBaseURI /redmine
    PassengerResolveSymlinksInDocumentRoot on

  ErrorLog ${APACHE_LOG_DIR}/error.log
  CustomLog ${APACHE_LOG_DIR}/access.log combined
Step 15: Create and set the ownership of the Gemfile.lock file. This will ensure that the www-data user of apache can access the Gemfile.lock
sudo touch /usr/share/redmine/Gemfile.lock
Set ownership
sudo chown www-data:www-data /usr/share/redmine/Gemfile.lock
Step 16: Enable Redmine website and apache2.servcies.
					sudo a2ensite redmine.conf
sudo systemctl restart apache2.service
You are now done. You should be able to access your Redmine website by putting in the server ip /redmine . localhost/redmine An example of what ours would look it would be 192.168.6.94/redmine
The default login for redmine is admin / admin.
Conclusion:
By following these step-by-step instructions, you can successfully install Redmine on Ubuntu 20.04 LTS using MariaDB (MySQL) as the back-end database and Apache Web Server as the user interface for accessing Redmine. With Redmine now installed on your system, you can harness its powerful features to streamline your project management and issue-tracking capabilities.
Stay updated on Redmine insights and troubleshooting tips by subscribing to our newsletter.
Discover Our Comprehensive Guide: Installing Redmine on Ubuntu 20.04 in 2024 – Watch Our Step-by-Step Video Tutorial on Our YouTube Channel
Get a free assessment now with our experts
Get a complimentary IT health check. Our tech support team will review your server updates, pinpoint any vulnerable ports, and assess your password robustness. Our mission is to provide you with a comprehensive understanding of your IT infrastructure’s security and recommend enhancements. Stay safeguarded with our helpdesk experts.